Monday, May 23, 2011

Pina Colada Mousse And The Thrill Of Innovation


I love this recipe simply because it was something I invented by myself. I was so thrilled the first time I made it and it came out well. I used to have Pina Coladas in Bangalore at Pub World. The consistency of the drink lent itself very well to conversion to a dessert.

The secret to a good cook, in my opinion, is the constant experimentation in the kitchen. The more you try out you know what works and what does not. I agree it means a lot of hits and misses and the misses end up being a real pain. But then a super hit recipe along the way makes it all worthwhile. This is one such recipe.


But the story of this mousse does not end there. After I made this, I gave the recipe to my sister in law. Now she is a very good cook. But she loves to say that she is just a so so cook. Which is so not true.
Now she started making the dessert and I had just given her the basic recipe and left it at that. I thought my instructions were pretty clear. But I had omitted to tell her that once the gelatin had melted, it needs to cool before adding to the cream mixture. So she went ahead very happily adding the hot gelatin to cold cream mixture. You can guess what the result was. She had this liquid with strings of gelatin running through it. No hope of it setting as it had already set into strings. Too late to set as dessert for the dinner that night. She just strained it and served a drink/dessert...
My lesson learnt? Never give half baked instructions while giving recipes. Now that I have a blog, I hope that I have learnt my lesson well.


INGREDIENTS:


1 tin Condensed Milk
200 ml Thick Coconut Milk
1 litre Pineapple Juice
2 heaped tablespoons Gelatin
200 ml Cream, whipped
30 ml Coconut Flavored Rum (Optional)

For the glaze:

5-6 tinned Pineapple Slices
1 tablespoon Cornflour
3 tablespoons Sugar


METHOD:

For the Glaze:


Puree the pineapple slices in the mixie.

Add the sugar.

Mix the cornflour in a couple to tablespoons of water and mix into the pureed pineapple.

Cook on a medium to low flame till it gets thick and translucent.

Take off the flame and leave to cool.


For the Mousse:


Mix the condensed milk, coconut milk and pineapple juice in a bowl. Also add in the coconut flavored rum if using.

In a small bowl pour about 1/2 cup of water. Sprinkle the gelatin on top and leave it to soak for about 20 minutes. After this heat on a very very low flame till the gelatin dissolves.

Cool the gelatin till it is room temperature.

Whip the cream till it has soft peaks.

Mix the gelatin liquid into the coconut milk/pineapple mixture. Let it set for a few minutes in the refrigerator.

Gently fold in the whipped cream into it and leave to set for about 4-6 hours.

Once set fully, pour the glaze on top and garnish as you wish.

Enjoy!!!!!!


Thursday, May 19, 2011

Parsi Falooda - Perfect Summer Drink


There is a very sweet story about the arrival of Parsis who, because of being persecuted in their own land, came to seek refuge in India. When they arrived into Gujarat, the king sent them a glass of milk filled to the brim signifying that the land was full and could not support any more people. The Parsis then added a pinch of sugar to the milk sending an astute message to the king that they would not take up too much space and will in turn add sweetness to the kingdom.

It is a standing joke at home that my husband is partial to Parsi food. Now now, I am not going to tell you why... It is how it is.. So this is a post only for him.

Summers in India are scorchingly hot. It is a far from pleasant experience to be outside during the day. In fact on a typical summer day, India can feel like an oven on overdrive, but humans with their superior skills have learnt to adapt to it and to cope with it .

So how do you keep the heat at bay?Indians know a million ways to keep cool and the list is endless. Cool cotton clothes.. drinks that cool the system down like nimbu pani, coconut water, kokum sherbet, aam panna... foods that are spicy hot paradoxically cool the body by making one sweat.

The Parsi falooda which originates in Iran is found in various forms all over the Middle East, Iran, Turkey, Pakistan and India. It is cross between a drink and a dessert.
The recipe presented here is the Parsi version of falooda. Try it. It is perfect for the Indian summer.


INGREDIENTS:

4 tablespoons Subja Seeds (Takmaria, basil)
1 cup Water

1/2 cup Cornflour
250 ml Water
Lots of ice cubes

4 tablespoons Rose Syrup
2 cups Milk
4 tablespoons Condensed Milk
4 scoops Vanilla Icecream


Pic below: Dry Subja Seeds (sorry the picture is a little out of focus)


METHOD:


To make the Subja seeds:

Soak the subja seeds in 1 cup water for 2-4 hours till it acquires a gelatinous coating ( see picture below)


To make the falooda:


Mix the cornflour into the 250 ml water and place on medium heat.


Keep stirring. As you stir it will start thickening.


Cook till it becomes translucent and comes together like a ball.


Keep a bowl of cold water filled with lots of ice cubes ready . You will also need a sev press which will help form very fine noodle shaped falooda. Put the cornflour mixture into the sev press before it turns cold. Then press out the falooda into the ice cube/water bowl. Leave the falooda in the water in the refrigerator for upto 4 days. If you take out the falooda from the water , it will stick together and lose its shape.


To make the milk:

Mix the milk with the condensed milk and chill in the freezer for an hour or so.

Alternately, you can thicken the milk over a low flame for a few hours till it thickens and add sugar. This is actually the original method, but I use my shortcut method. The taste does not suffer because of this.


Now for the assembly:


Take 4 tall glasses.

Pour the rose syrup at the bottom.

Top with a couple of tablespoons of falooda.

Gently pour the milk mixture on top without disturbing the layers.

Add a tablespoon of soaked subja seeds.

Top up with a scoop of vanilla ice cream .

You can optionally garnish with a few sliced nuts.

Stick in a straw and a spoon and serve very cold.

ENJOY!!!!!!!!


Thursday, May 5, 2011

Quesadillas and Feeding Hungry Kids


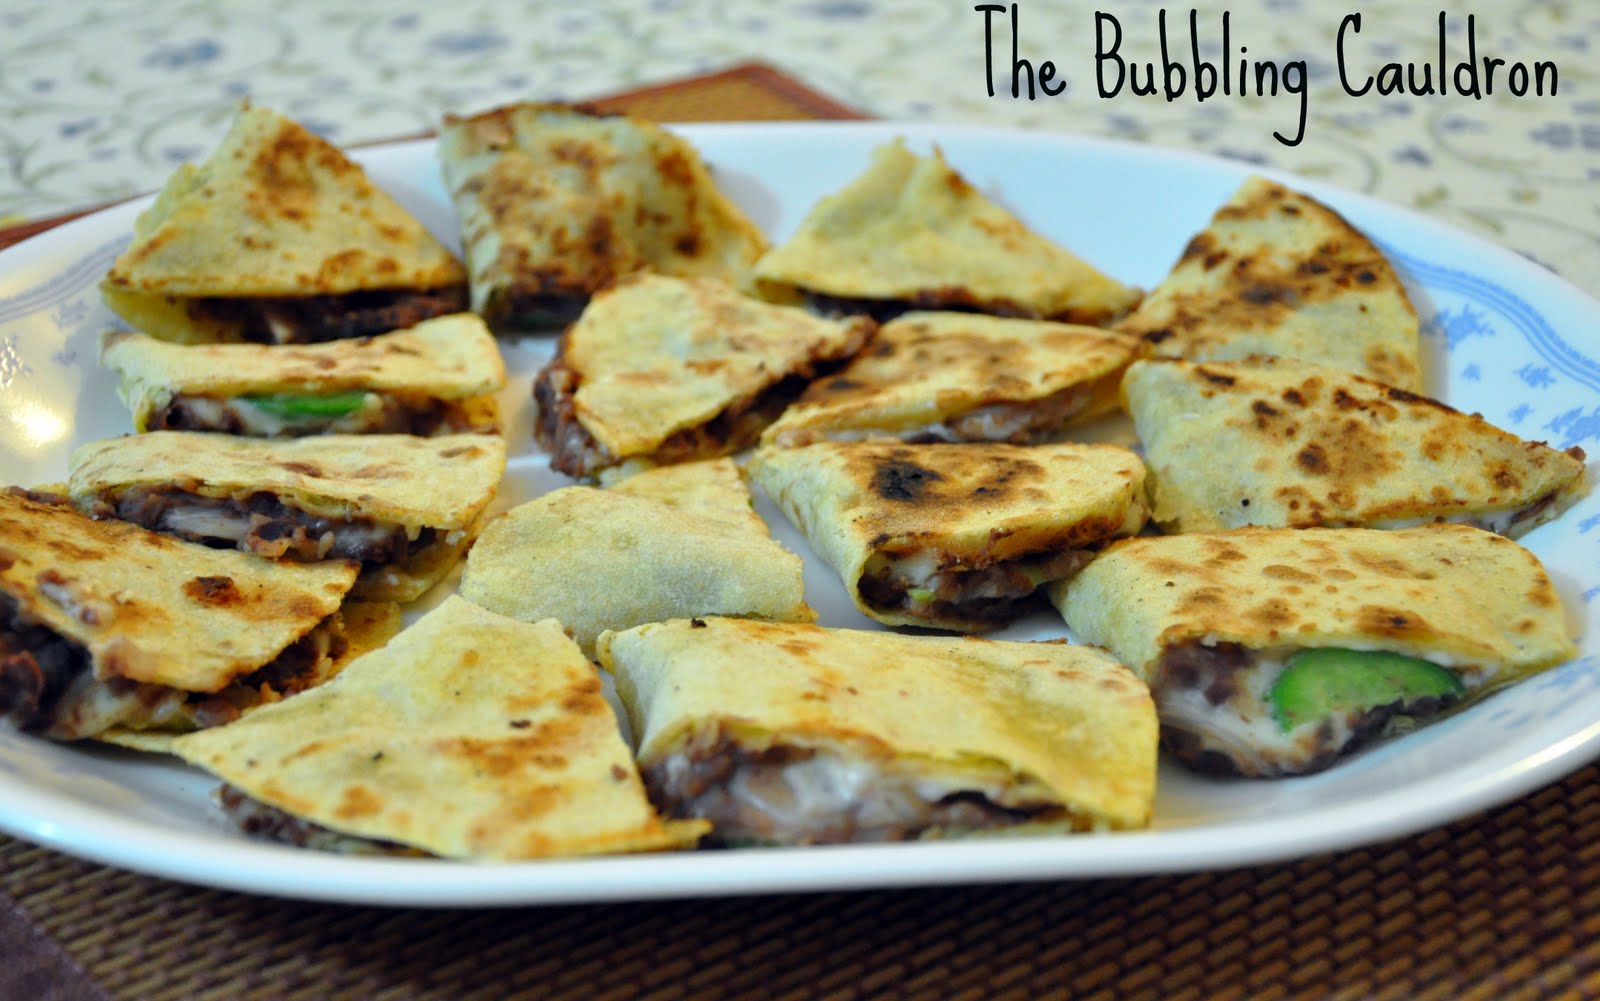
This is a quick snack to make when kids are home from school- hungry and cranky. It is easy enough to make and has very kid friendly ingredients like cheese. I used home made corn and flour tortillas, recipe for which is also given below.


Before I start with the recipe, let me apologise for the picture accompanying this post. It is sad to say the least and does not do justice to quesadillas. But like I always say for all my uninspiring pictures... don't judge a book by its cover. This tastes GOOD!!! And is wholesome and filling...


The best part of this recipe is also that you have a free rein on what you want to use as the filling.The only constant is Cheese. Most things go well as a filling - onions, olives, capsicums, cooked chicken, spinach, refried beans, mushrooms... the list goes on.


Now for the recipe


Ingredients:

For the torillas:

2/3 cups Maize flour (not cornflour)
1/3 cup All Purpose Flour
Salt to taste


For the filling:

1 cup Cheese
your choice of fillings ( sliced onions, chopped olives, sliced mushrooms, refried beans, spinach, sliced capsicum etc etc)


Method:


For the Tortillas:

Make a stiff dough using a little water a teaspoon at a time.

Roll out into tortilla (like a chapati) Watch this for instructions on how to roll out a tortilla.

Cook for a few minutes on a flat griddle till brown spots appear.


For the quesadillas:

Place the tortilla flat.

On one half put a couple of tablespoons of cheese.

Over that out the filling of your choice.

Fold over into a semi circle.

Place on the griddle again and cook both sides till cheese melts a little bit.

Cut into pieces and serve hot along with some salsa and guacamole.

ENJOY!!!!!!


Sunday, April 24, 2011

Spicy Corn Tartlets And Three Of My Favourite Things


I love baking. I love taking nice pictures for my blog. And I love corn (particularly the sweet American corn niblets. The kind that come in a tin. Yes I know. They are unhealthy. But I still love them, okay?). But when all three things come together and perfectly for one post ... my day is made.

Eden restaurant in Chennai serves up this awesome spicy corn on toast. It is a great tasting dish but rich. I am sure they are very generous with their cream and butter. This spicy corn recipe is based on that. I made it purely from tasting the one at Eden.

I have to say, at the cost of blowing my own trumpet, it turned out exactly like theirs. Tasted just the same. But instead of serving it up on toast, I made these little tartlets and served it as an appetizer at a recent dinner. They went like hot cakes. I ran out of them even though I made more than five dozen. There were other appetizers too. There were only 8 guests. Enough said.


INGREDIENTS:

For the Tarts -

200 grams All Purpose Flour
100 grams ice cold Butter
A pinch Baking Powder

For the Corn filling -

1 tin Corn Niblets
1 tablespoon All Purpose Flour
1 cup Milk
1 tablespoon Butter
1 Onion chopped really finely
2 Green Chillies chopped fine
2 tablespoons Tomato Puree
1/4 cup Cream
Salt to taste


METHOD:


For the tarts:

Sift the baking powder and flour together.

Cut the butter into pieces and mix into the flour using fingertips till it resembles fresh breadcrumbs.

Gather into a dough. If very dry, add ice cold water a teaspoon at a time till a dough is formed. You will not need to much water so be very careful while adding the water.

Press out thinly into the tart moulds. Bake at 180 deg C for about 12-15 minutes till a light golden brown.


For the filling:


Melt butter on a slow flame and add the green chillies and onion.

When well fried, add the flour. Fry well and add milk in a steady stream taking care not to allow lumps to form.

Cook till thickened and a saucy consistency is obtained.

Add the tomato puree and cream and cook well.

Add in the corn niblets.


To serve -

Spoon the filling into the tarts. Serve hot.


ENJOY!!!!!!!!!


Sunday, April 17, 2011

Beetroot Halwa and Dad's Cooking Experiments


My father was your typical working person. Off to work in the morning, back in the evening, cursory look at marks and homework. He was a tremendously hardworking and focussed person for whom nothing was too much work. I wish I had one tenth of his focus and capacity for work. I am sure I would have been a lot better for it. He was an engineer by profession and a pretty good one at that. He never forgot what he learned in college till the last. He remembered formulae, theorems... everything...

But he had a secret love for cooking. He used to love to experiment in the kitchen. But he never looked at cooking from a chefs point of view. His approach was more from an engineer's angle. He would love to tell my mom that for dosas to be perfect, the temperature of the tava should be this and that. Or some other such similar things. But for all his efforts, my mom's experience won each time. She would effortlessly make these yummy foods and he would struggle to get the taste just right.

One his favourite foods to make was Beetroot Halwa. Don't ask me why. I have no idea. This is not a sweet that I have seen commonly on tables. But he liked it, I think. Once I grew up and developed a love for cooking, I realised that I would like to learn this as well and now it has become a firm favourite for me.


INGREDIENTS:

2 cups Beetroot grated
2 cups Milk
1 cup sugar
3 tablespoons Ghee (clarified butter)
1/4 teaspoon Cardamom powdered
1 tablespoon Cashewnuts for garnish
1 tablespoon Raisins


METHOD:


Cook the beetroot in the pressure cooker along with the milk till fully cooked and soft.

Open the pressure cooker and let out the steam.

Add the ghee and fry the halwa for a few more minutes till it starts coming together like a ball. It also develops a glossy look by now.

Add the sugar and cook till it thickens up again.

Fry the raisins and the cashewnuts in a teaspoon of ghee and add to the halwa along with the cardamom powder.

Serve cold or hot.

ENJOY!!!!!!!!!


UPDATE: Thanks Asha for pointing out the error of forgetting the sugar. As you can see now, it has been rectified.